BrainXell
Background
BrainXell, Inc. specializes in the differentiation of human iPSCs to a variety of neuronal cell types that provide researchers biologically relevant systems for CNS drug discovery and toxicity screening. Researchers can choose from a variety of highly pure, functionally specialized subtypes that exhibit biochemical and functional characteristics of human neurons. These neurons provide an ideal in vitro experimental system for a wide range of neurophysiological investigations. Multi-electrode arrays (MEA) are used to evaluate neuronal activity of cell cultures and measure extracellular voltage changes that occur as neurons fire action potentials. Such measurements reveal firing patterns of individual neurons as well as patterns of neuronal networks that exist in the cell culture. The measurements are non-invasive and allow for repeated measurements over the lifetime of a cell culture. MEA can be used to study the physiological behavior of neurons, acute and long-term pharmacological responses, and disease phenotypes. This application protocol describes the culture of BrainXell Spinal Motor Neurons to perform consistent and reproducible MEA assays to investigate neuronal activity.
Contents
- One vial cryopreserved human neurons (options):
- Spinal Motor (BrainXell BX-0100-XX)
- Cortical Glutamatergic (BrainXell BX-0300-XX)
- Medium Spiny Neuron GABAergic (BX-0700-XX)
- One vial cryopreserved human astrocytes (BrainXell BX-06XX-XX)
- One vial cryopreserved human Microglia (BX-09XX-XX)
- BrainFast Motor #BX-2100, Glut #BX-2300, or GABA #BX-2400 (neuron specific) formerly known as Neuron Seeding Supplement
- BrainFast D4 (BrainXell #BX-2040) formerly known as Neuron Day 4 Supplement
- BrainFast SK (BrainXell #BX-2020) formerly known as Supplement K
Storage
- Immediately transfer the cryovials of cells to a liquid or vapor nitrogen storage system.
- BrainFast supplements should be stored at -20°C (6 months) or at -80°C (18 months) until time of initial thaw. Return vial to -20°C after initial and repeated use to maintain supplement stability.
Additional Materials Needed
- Neurobasal Medium (Thermo Fisher Scientific #21103049)
- B-27 Supplement (Thermo Fisher Scientific #17504044)
- N-2 Supplement (Thermo Fisher Scientific #17502048)
- GlutaMAX Supplement (Thermo Fisher Scientific #35050061)
- Geltrex (Thermo Fisher Scientific #A1413201) or Cultrex (R&D Systems #3432-001-01)
- MEM NEAA (Thermo Fisher Scientific #11140050)
- Chemically Defined Lipid Concentrate (Thermo Fisher Scientific #11905031)
- Ascorbic Acid (MilliporeSigma #A8960)
- 2-Mercaptoethanol (Thermo Fisher Scientific #21985023)
- BDNF (Thermo Fisher Scientific #450-02)
- GDNF (Thermo Fisher Scientific #450-10)
- IL-34 (Thermo Fisher Scientific #200-34)
- M-CSF (Thermo Fisher Scientific #300-25)
- TGF-β1 (Thermo Fisher Scientific #100-21C)
- PDL-coated 24-Well CytoView MEA Plate (Axion Biosystems # M384-tMEA-24W)
- Refer to BrainXell Culture Plates PDL Coating Protocol v10.0
Equipment Needed
- Maestro Edge (Axion Biosystems)
- Alternate equipment is available for MEA/electrical assays. Protocols may need to be adjusted based on manufacturer recommendations.
Cell Culture Procedure
Day 0 Seeding Preparation
To seed (1) 24-well plate within the recommended seeding density you will need a total of 1.2 – 2.4 million live neurons, plus additional astrocytes and microglia at the desired ratio to neurons. Review the Certificate of Analysis for each lot number to determine the expected total live cell count per vial.
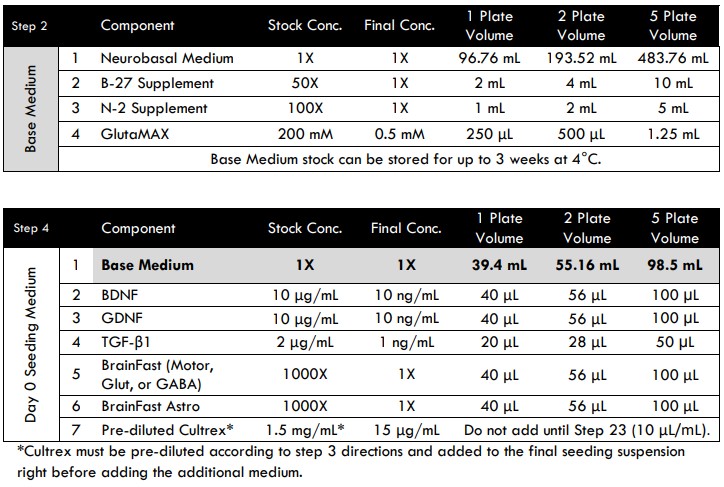
- Gather the Base Medium components according to the recipe (see Tri-Culture Media Compositions for MEA section below).
- Note that BDNF, GDNF, IL-34, M-CSF, and TGF-β1 are lyophilized powders. Follow the manufacturer’s instructions for reconstitution and long-term storage. We recommend creating stock solutions at the listed concentrations shown in the media compositions tables below.
- We recommend reconstituting ascorbic acid in DMEM/F-12 medium to create a 200 mM stock solution; See “Preparation of 200 mM Ascorbic Acid” at end of this document for important information.
- Working in a cell culture hood (biological safety cabinet), combine all Base Medium components in an appropriately sized sterile container to create a working stock.
- Prepare diluted Cultrex solution: add 450 μL of cold DMEM/F12 into a 50 μL aliquot of frozen Cultrex taken directly from the -80 freezer. Mix to dissolve and store at 4°C until it is time to add to medium during Step 23.
- Prepare Day 0 Seeding Medium without Cultrex by adding BrainFast “Neuron Specific” supplement (1:1000) and BrainFast Astro (1:1000) to Base 1 Medium. Note: Cultrex will be added at a later step.
- Allow the Seeding Medium to equilibrate to room temperature for at least 15 minutes prior to use. Do not warm the medium in a 37°C water bath.
- Culture plates should also be at room temperature prior to use.
- Prepare two labeled 50 mL conical tubes: add 3 mL of the Seeding Medium without Cultrex to each tube.
- Prepare two labeled microcentrifuge tubes: add 25 μL Trypan Blue solution to each tube for cell counting.
Day 0 - Seeding of Neurons and Astrocytes
- Remove the cryovials from nitrogen storage and place in a 37°C water bath. To minimize contamination, avoid submerging the caps. Gently move the vials within the bath to increase the rate of thawing.
- As soon as the last of the ice melts, which will take ~75-90 seconds, remove the vials from the water bath. Disinfect the vials by spraying them with 70% ethanol and transfer them to the cell culture hood.
- Using a P1000 pipette, add 500 μL Day 0 Seeding Medium to each cryovial at a rate of ~2-3 drops/sec. This process should take about 10 seconds per cryovial.
- Gently transfer the contents (~1mL total) of each cryovial to its respectively labeled 50-mL tube.
- To collect any residual cells, gently add another 1 mL of Day 0 Seeding Medium to each cryovial and then transfer to the coinciding 50-mL tube. There should now be 5 mL total suspension in each tube.
- Gently swirl the conical tubes and pipette up and down 3-5 times to ensure cells are evenly suspended in medium. Transfer 25 μL of each cell suspension to the labeled microcentrifuge tube prefilled with 25 μL Trypan Blue solution and pipette up and down a few times to mix.
- Centrifuge the diluted cells in the 50-mL tubes at 1115 rpm (200xg) for 5 mins.
- While the cells are centrifuging, count the cells from the prepared Trypan Blue/cell suspensions.
- Count the number of viable and dead cells using a hemocytometer to determine the live cell concentration (live cells/mL) and overall viability.
- Based on your cell counts, calculate the total live number of cells that were in each suspension.
- Ex: Neuron count was 1.02 million live cells/mL * 5 mL of suspension = 5.2 million total live neurons. Astrocyte count was 0.6 million live cells/mL * 5 mL = 3.0 million total live astrocytes.
- A recommended MEA seeding density is 50,000 – 100,000 viable neurons/well, with a typical seeding ratio of neurons to astrocytes in the range of 2:1 – 6:1. Other ratios may be suitable depending on assay needs, but the neuron/astrocyte suspension will be seeded as single 40 µL droplets.
- Calculate the volume of Day 0 Seeding Medium you will use to resuspend the pellets to create 2X concentrations of each cell type. The individual suspensions will be combined to make a final combined 1X cell suspension at the desired ratio.
- Note: Once microglia are eventually added on Day 8, you should have no more than a combined total of 140,000 live cells in each well so plan accordingly.
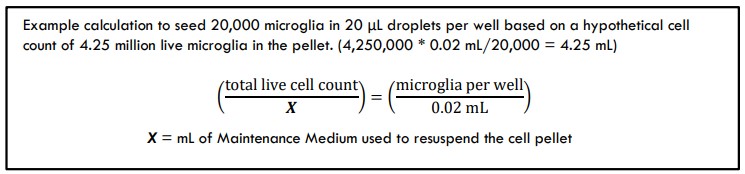
Calculate the volumes using the following example calculations:

- After centrifugation is complete, carefully remove the medium without disturbing the neuron pellet.
- Immediately add the calculated volume of Day 0 Seeding Medium (that does not contain Cultrex) to the pellet to create the 2X suspension. Resuspend the cells by gently pipetting until the suspension appears homogeneous and no clusters are visible.
- Repeat steps 17 and 18 for the astrocyte pellet.
- In a new sterile tube: add together the appropriate volumes of the 2X neuron and 2X astrocyte suspensions to create a final 1X seeding suspension. Gently mix the neurons and astrocytes together using a P1000 pipette to create a homogeneous mixed suspension.
- Seed a 40 μL droplet (dot) of cells over the electrodes in each well of the MEA plate. Complete one well at a time being careful not to touch the electrodes with the pipette tip to prevent scratching of the surface.
- Transfer the plate to a humidified incubator at 37°C with 5% CO2 for 30-60 minutes.
- At 30 minutes, check the cells under a microscope to make sure they have adhered to the surface. If they appear to be loosely attached, wait an additional 30 minutes before proceeding with the next step to prevent dislodging the cells from the electrodes upon addition of medium.
- Add pre-diluted cold Cultrex to the remainder of the Day 0 Seeding Medium. You will need to add 10 µL of diluted Cultrex per each 1 mL of Seeding Medium.
- Example for (1) plate: add 150 µL of pre-diluted cold Cultrex to 15 mL of room-temp Seeding Medium; mix well.
- Gently add 460 μL of the Seeding Medium containing Cultrex to each well. Aim away from the center to prevent direct washing of medium over the cells.
- Transfer the plate back to the humidified incubator at 37°C with 5% CO2. The day of cell plating (today) is designated as Day 0.
*Note: The entire thawing and initial seeding process should be completed within 1.5 hours. Post-thaw viability and overall cell health could be severely impacted and lead to an unsuccessful culture if the process is too long.
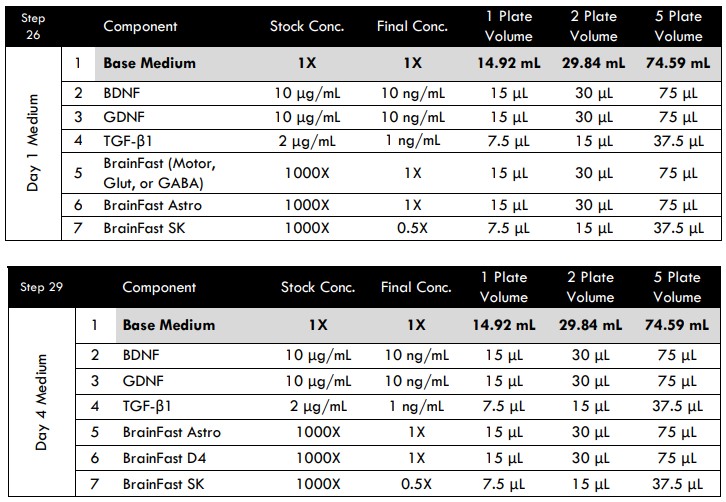
Day 1 Medium Replacement
- On Day 1 (24 hours after seeding), prepare fresh Day 1 Medium.
- Gently remove 460 μL media from each well, leaving 40 μL/well.
- Gently add 460 μL of Day 1 Medium to the entire plate for a total volume of 500 μL/well.
Day 4 Medium Addition
- On Day 4 (96 hours after seeding), prepare fresh Day 4 Medium.
- Gently add 500 μL/well of Day 4 Medium to the entire plate for a final volume of 1 mL/well.
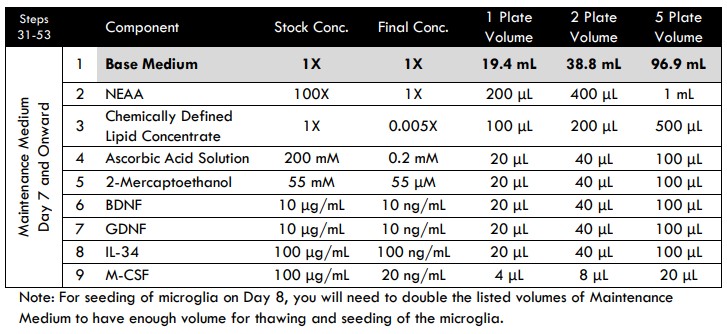
Day 7 and Onward Medium Changes
The purpose of this additional step is to dilute the TGF-β1and BrainFast SK currently in the well. It shifts the medium composition in preparation for microglia addition on Day 8.
- Prepare fresh Maintenance Medium to complete a half medium change.
- Gently remove 500 μL media from each well on the plate.
- Gently add 500 μL/well of Maintenance Medium to the entire plate for a final volume of 1 mL/well.
Day 8 Microglia Addition
- Prepare fresh Maintenance Medium at twice the listed table volume, which will be used to seed the microglia. Allow the medium to equilibrate to room temperature for at least 15 minutes. Do not warm the medium in a 37°C water bath.
- Prepare one 50-mL conical tube: add 3 mL of Maintenance Medium.
- Prepare a microcentrifuge tube: add 25 μL of Trypan Blue solution for cell counting.
- Remove the cryovial of microglia from liquid nitrogen storage and place in a 37°C water bath. To minimize contamination, avoid submerging the caps. Gently swirl the vials within the bath to increase the rate of thawing.
- As soon as the last of the ice melts, which will take ~75-90 seconds, remove the cryovial from the water bath. Disinfect the vial by spraying it with 70% ethanol before transferring it into the cell culture hood.
- Using a P1000 pipette, add 500 μL of Maintenance Medium to the cryovial at a rate of ~2-3 drops/sec. This process should take about 10 seconds.
- Gently transfer all contents from the cryovial (~1 mL) to the prepared 50-mL conical tube.
- To collect any residual cells, add an additional 1 mL of Maintenance Medium to the cryovial and then transfer to the 50-mL tube. There should now be 5 mL total suspension in the tube.
- Gently swirl the conical tube and pipette up and down 3-5 times to ensure cells are evenly suspended in medium. Transfer 25 μL of cell suspension to the microcentrifuge tube prefilled with 25 μL Trypan Blue solution and pipette up and down a few times to mix.
- Centrifuge the diluted cells in the 50-mL tube at 1115 rpm (200xg) for 5 mins.
- While the cells are centrifuging, count the cells using the prepared Trypan Blue/cell suspension.
- Count the number of viable and dead cells using a hemocytometer to determine the live cell concentration (live cells/mL) and viability. Remember the suspension was diluted 1:1 with Trypan Blue.
- Based on your cell count, calculate the total live number of microglia that are in the 5 mL of suspension.
- Ex: cell count concentration was determined to be 0.85 million live cells/mL * 5 mL suspension = 4.25 million live cells.
- Calculate the volume of Maintenance Medium you will use to resuspend the pellet to reach your target microglia seeding density.
- A typical neuron : astrocyte : microglia seeding ratio is 2:1:1 to 6:1:1; alternately, seed less microglia than the number of astrocytes in each well (10,000 to 35,000 microglia/20 μL addition per well). Other ratios may be suitable depending on experimental needs.
- After centrifugation is complete, carefully remove the medium without disturbing the microglia pellet.
- Immediately add Maintenance Medium to the cell pellet to reach the total calculated volume of your seeding suspension. Resuspend the cells by gently pipetting until the suspension appears homogeneous and no clusters are visible.
- Remove 800 μL/well from each well.
- Being careful not to touch the neurons and astrocytes already in culture on the well surface, gently add 20 μL of microglia seeding suspension to the bottom well directly over the astrocytes and neurons.
- After seeding the microglia, transfer the plate to the incubator for 2 hours to allow the microglia to settle and firmly attach to the bottom of the well.
- After 2 hours, transfer the plate to the BSC and very gently remove 200 μL from each well using a multi-channel pipette allowing 20 μL/well to remain in the bottom well. Then, using a P200 pipette set to 200 μL, suction out the remaining 20 μL of media in succession from all four wells of the first column without expelling the medium from the pipette tip until all four wells are emptied of medium (this allows you to quickly complete the medium change). Do not to touch the pipette tip to the seeding surface to prevent disruption of the tri-culture, but be sure to remove all the medium from each well in the column. Next, using a multi-channel pipette, quickly but very gently, add 300 μL of Maintenance Medium to the first column of wells. Complete the medium replacement process for the remaining 3 columns of wells. Once you have completed the entire plate, gently add 700 μL of Maintenance Medium to each well to bring the total volume to 1 mL/well. Note: This medium exchange step is important for removing any dead microglia to promote a healthier tri-culture.
- Transfer the plate back to the humidified incubator at 37°C with 5% CO2.
Day 10 and Onward Medium Changes
- Change half the medium (500 μL/well) 2-3 times weekly (Day 10, 13, 16, etc.) using Maintenance Medium freshly prepared on each day of use.
- Note: Higher cell densities may need media changes more often. If the media is changing color (yellowing) sooner than 3 days, complete an early medium change.
*Note: The physical process of completing a medium change too quickly can result in microglia migrating to the opposite side of the well. To minimize the effect, it is recommended to go slowly during medium exchange and alternate locations in the well where the medium is added. For example, if medium is added to the left side of the well, the next time a medium change occurs add the medium to the right side of the well.
MEA Assay
Neural activity should be present to some degree by 12 days in vitro and will reach a plateau around 21 days in vitro.
- For each recording, transfer the plate from the incubator to a Maestro Edge pre-equilibrated to 37℃ and 5% CO2.
- Place the MEA plate into the instrument and allow an additional 10-15 minutes before starting the acquisition to let the system and culture equilibrate.
- Record for 10 minutes or your desired length of time.
- Return the plate to the incubator to maintain the culture between recordings.
Note: Any required medium changes that fall on a recording day should be completed after recordings are acquired to minimize random variation from reading to reading.
Specific seeding density for MEA activity
If attempting to achieve electrical activity as quickly as possible for your experiments, it is recommended to seed at a higher density of 90,000-100,000 neurons/well.
Alternately, if attempting to perform a long-term study (75+ days in culture) it is recommended to seed at a lower density of ~45,000 neurons/well. Starting in the second week of culture, Maintenance Medium can be supplemented with 0.2X BrainFast SK (i.e., 4 μL of BrainFast SK into 20 mL of medium) if proliferation of flat cells is a concern. Perimeter wells on the plate should be monitored over time for reduced volumes due to heightened evaporative effects near the plate edges. If some wells begin to show less volume over time, the lower well volumes can be increased by adding additional fresh Maintenance Medium to the wells at the time of the half medium change.
Tri-culture Media Compositions for MEA
Preparation of 200 mM Ascorbic Acid Solution
Additional Sterile Materials Required
50-mL Conical Tubes, 0.22 micron Filter, Amber Microcentrifuge Tubes
Critical Information
- Ascorbic Acid must be added into the DMEM/F12 (not vice versa) to ensure it dissolves.
- The rate of Ascorbic Acid addition to DMEM/F12 is critical. If added too rapidly, the chemical will fail to go into solution.
- Only mix by inversion. Undissolved Ascorbic Acid will adhere to pipette tips and other implements.
- Ascorbic Acid is pH, temperature, and light sensitive.
Steps
- Aliquot 17.2 mL of DMEM/F12 into a 50-ml tube.
- Weigh 1.0 gram of Ascorbic Acid using a separate vessel.
- Critical Step: Gradually transfer Ascorbic Acid into the tube of DMEM/F12 (no more than 0.2 gram at a time, waiting 10 seconds between each addition).
- Secure the cap on the tube and invert to mix.
- Allow the Ascorbic Acid to dissolve into the solution:
- Place in a 37°C water bath for 30 minutes, inverting the tube every 10 minutes to mix.
- After 30 minutes check to see if Ascorbic Acid is fully dissolved. If not, invert tube to mix and place capped tube at 4°C overnight.
- After overnight storage, invert to mix and confirm Ascorbic Acid is completely dissolved.
- Filter the fully dissolved Ascorbic Acid Solution using a Steriflip filter or equivalent 0.22 µm sterile filter.
- Aliquot into amber 1.5mL Eppendorf tubes; recommended volumes of 110µl or 550µl.
- Maintain frozen aliquots at -20°C for up to 6 months. Aliquots are single use. Do not refreeze.